
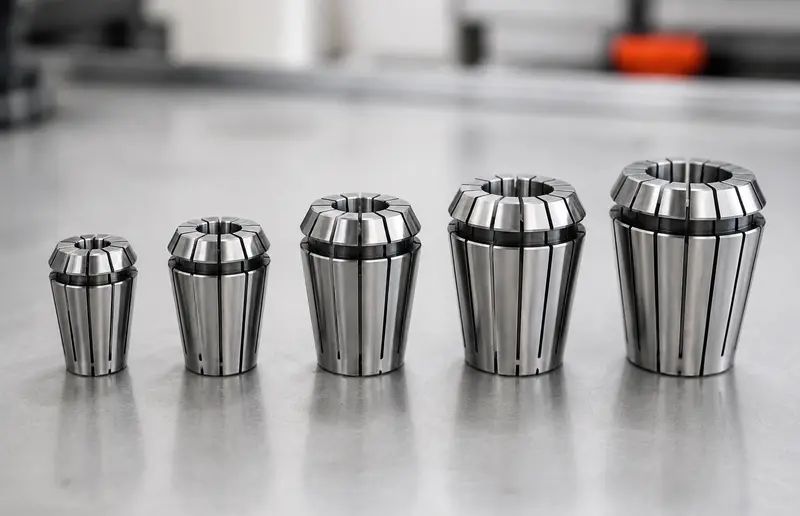
ER11 and ER20 are two different sizes in the ER collet system. The number identifies the collet, nut and holder interface; it is not simply the tool-shank diameter. An ER11 collet does not belong in an ER20 nut or taper, and an ER20 collet does not belong in an ER11 assembly. Select the series from the spindle or collet chuck first, then select an approved collet whose marked clamping range contains the measured cylindrical shank.
Quick answer: use ER11 only with an ER11 holder and compatible ER11 nut; use ER20 only with an ER20 holder and compatible ER20 nut. Match the collet’s actual range to the measured shank, keep every contact surface clean, snap a standard ER collet into the nut before threading the nut onto the holder, and tighten with the manufacturer’s wrench and torque data. The MatchMyTools selector uses a conservative 1–7 mm ER11 and 1–13 mm ER20 working envelope; the markings and documentation for your exact spindle, holder and collet remain authoritative.
In this guide
- ER11 versus ER20 at a glance
- How to identify the complete ER system
- How to match a collet to the shank
- Correct ER collet installation
- Runout, stickout and tightening
- Troubleshooting vibration and poor grip
- Maintenance and safety checks
- Frequently asked questions
ER11 versus ER20 at a glance
| Decision point | ER11 | ER20 | What must be verified |
|---|---|---|---|
| System components | ER11 collet, ER11-compatible nut and ER11 holder taper | ER20 collet, ER20-compatible nut and ER20 holder taper | Exact series and nut style in the spindle or holder manual |
| MatchMyTools working envelope | 1–7 mm | 1–13 mm | Actual collet range and holder capacity can differ by product |
| Typical reason to choose | Compact nose and small shanks | Broader shank range and a larger assembly | Clearance, operation, tool load and manufacturer approval |
| Interchangeability | ER11 and ER20 components are not interchangeable | Do not improvise with a different collet, nut or taper | |
| Final size choice | Choose the tightest approved collet range that contains the measured shank | Marking, product drawing and measured shank—not appearance | |
ER20 is not automatically “better” than ER11. A larger system can accept a broader family of tools in many product lines, but its nose also occupies more space. ER11 is useful where access and small tools matter, provided the operation stays within the spindle, holder and tool limits. The correct choice is the system engineered into the machine plus an approved tool setup—not an upgrade inferred from the larger number.
The MatchMyTools ER11 / ER20 compatibility calculator mirrors the current selector’s validated working envelope. It is a routing check, not a replacement for the product drawing. Haas, for example, publishes product-family ranges that differ from this conservative envelope, while SCHUNK lists individual ER20 collets up to a 12–13 mm clamping interval. That variation is exactly why the component marking and manufacturer’s data control the final decision.
How to identify the complete ER system
An ER setup is a chain. The machine spindle may have an integral ER taper, or it may accept a separate collet chuck through another machine interface. The chuck body contains the matching internal ER taper and external thread. The collet sits between the body and nut. An eccentric extraction ring inside a conventional nut engages the collet’s groove. Tightening the nut draws the slotted collet into the taper so it closes around the tool shank.
Identify every link before ordering a replacement:
- Machine interface: read the machine or spindle plate, manual and approved-accessory list. A label such as “ER11 spindle” usually identifies the front toolholding system, but it does not describe every permissible nut or operating speed.
- Holder body: look for an engraved ER series, manufacturer and part number. On a separate collet chuck, also verify the machine-side taper, pull stud or retention interface.
- Nut: identify the series and the exact style. Standard, mini, bearing, sealed-coolant and manufacturer-specific nuts are not automatically interchangeable merely because a wrench seems to fit.
- Collet: read the series and clamping interval engraved on the collet or supplied packaging. Confirm whether it is a standard collapsing collet, a straight-bore/sealed design, a tap collet or another special type.
- Tool: measure the clean cylindrical shank with a suitable micrometer or calibrated caliper and compare it with the tool drawing. Do not measure a flute, coating build-up, burr or damaged portion.
The number after ER is a series, not a shank size
“ER11” does not mean an 11 mm shank, and “ER20” does not mean a 20 mm shank. These labels distinguish standardized dimensional families for the collet and its corresponding holder and nut. A 6 mm tool may be held by an appropriate ER11 or ER20 system if the exact collet, holder and operating conditions permit it. The systems still cannot share their collets or nuts.
Do not identify a collet by color or approximate dimensions
Used collets can lose packaging, and inexpensive sets may have faint markings. Clean the component and use its engraving and traceable product drawing. Measuring only the largest outside diameter is insufficient: different series and special designs can look similar in a photograph. If the marking is absent, damaged or inconsistent with the holder, quarantine the component until the manufacturer or supplier identifies it.
How to match a collet to the tool shank
Start with the real shank, not the cutting diameter printed prominently on the tool. A router bit can have a 6 mm cutting diameter and a 1/4-inch shank; an end mill can have a reduced neck or a different shank tolerance. The gripping zone must be cylindrical, undamaged and within the tool and collet makers’ permitted tolerances.
Many conventional ER collets have a collapsing range, but that range is product-specific. Haas advises choosing the tightest available collet for the shank to maximize contact and minimize runout. Sealed straight-bore and tap collets can have no ordinary collapse range at all. Never assume that every “6 mm” collet accepts the same minimum and maximum diameters.
| Measured shank | Safe selection logic | Unsafe shortcut | Final check |
|---|---|---|---|
| 6.00 mm | Select an ER11 or ER20 collet whose published interval contains 6.00 mm | Choosing by tool cutting diameter | Series, interval, holder and operation are approved |
| 6.35 mm (1/4 in) | Use a marked inch collet or a metric interval explicitly covering 6.35 mm | Forcing it into a 5–6 mm or straight-bore 6 mm collet | The entire stack is approved for the inch shank |
| 6.00 mm marked tool measuring outside tolerance | Stop and inspect the tool, instrument and specification | Using extra nut torque to close the error | Shank is clean, round and within manufacturer tolerance |
| 12.7 mm (1/2 in) | Confirm the exact ER20 product range and holder capacity before use | Assuming every ER20 system reaches 13 mm | Spindle power, operation, tool mass and speed are also permitted |
| Unknown or damaged shank | Quarantine and identify or replace it | Trial clamping and test spinning | Traceable size and undamaged gripping surface |
Metric and inch sizes that look close are not equal
A 1/4-inch shank is 6.35 mm, not 6 mm. A 1/2-inch shank is 12.7 mm, not 12 mm. Whether a conventional collapsing collet can legitimately cover a near size depends on its marked interval and the maker’s instructions. A straight-bore or sealed collet commonly requires the exact nominal shank. Never drive an oversized shank into a smaller bore, close a collet below its stated minimum or rely on wrench force to correct a mismatch.
Use the tightest approved range
If several standard collets publish overlapping intervals, choose according to the holder manufacturer’s selection guidance. The tightest approved option generally gives better contact than operating a larger collet near maximum collapse. Do not transfer that rule to specialty collets without checking their instructions. Coolant-sealed, tapping and high-precision designs can use different selection logic.
Correct ER collet installation
Isolate the machine and follow its lockout or tool-change procedure. Wear hand protection only where the machine and workplace procedure allow it; loose gloves must never be exposed to a rotating spindle. Use a clean bench or dedicated holder fixture so the precision surfaces cannot roll into chips.
- Inspect the holder: clean the internal taper and threads with approved, lint-free tools. Look for fretting, dents, corrosion and embedded chips.
- Inspect the nut: clean the thread, pressure face and eccentric extraction ring. Replace a cracked, distorted or heavily worn nut.
- Inspect the collet: clean every slot and taper surface. Reject cracks, raised burrs, corrosion, collapsed segments or damage in the extraction groove.
- Snap the collet into the nut first: for a conventional ER assembly, angle the collet so its groove engages the eccentric ring, then press until it seats. Haas explicitly describes engaging this groove and snapping the collet into place before assembly.
- Insert the tool: place only the clean cylindrical shank through the collet. Use the manufacturer’s minimum engagement and do not clamp on flutes, a Weldon flat unless approved, a radius, a laser mark that raises material or a damaged zone.
- Thread by hand: start the nut squarely on the correct holder and turn it freely by hand. If it binds, stop; cross-threading or an unmatched component cannot be corrected with a wrench.
- Set projection: keep stickout only as long as the toolpath and collision clearance require. Confirm that the shank does not bottom where the holder instructions prohibit it and that coolant passages remain as designed.
- Tighten correctly: restrain the holder with the approved fixture or spindle procedure. Use the correct wrench and the torque specified for that holder, nut, collet and operation. Do not use an impact wrench, hammer or improvised extension.
- Verify: remove all tools and gauges, rotate by hand if the machine procedure permits, check clearance, then perform the prescribed low-risk test before production.
Why the collet goes into the nut first
The eccentric ring is not decoration. It retains the collet in the nut and extracts it from the taper when the nut is loosened. Placing a loose collet in the holder and then tightening the nut can leave the groove improperly engaged, create uneven seating and make removal unreliable. Specialty assemblies may differ, so the product manual still takes priority.
How far should the shank enter?
There is no universal exposed-length number. The gripping zone should cover the maker’s required collet length while staying entirely on the cylindrical shank. The cutting edge or flute should remain outside the grip unless the toolholding system expressly permits otherwise. At the same time, do not blindly push the tool against an internal stop: some holders, balance conditions and through-coolant systems require a defined position. Use the tool and holder drawings, then choose the shortest safe projection that clears the work, fixture and nut.
Runout, stickout and tightening
Runout is the radial deviation observed as the assembly rotates. It can be contributed by the spindle, machine interface, holder, nut, collet, tool shank, dirt and measuring method. A low-runout collet cannot compensate for a damaged spindle taper, and a reading at the tool tip includes more leverage than a reading close to the collet.
Measure using the machine or holder manufacturer’s procedure, a suitable test bar and a calibrated indicator. Record the measurement distance. Rotate the assembly as instructed; do not place hands near a powered spindle. If the result is poor, clean and reassemble once before replacing parts randomly. Rotating the collet or tool to “clock out” a large error can hide a damaged component without fixing it.
Minimize unsupported length
Extra projection reduces stiffness and amplifies deflection. That can create chatter, edge chipping, poor finish and apparent runout at the cutting edge. Reduce stickout only within toolpath and clamping requirements. Do not bury flutes in the collet merely to shorten the assembly, and do not shorten so far that the nut or holder can collide with the work.
Use exact torque data
Torque is not a universal ER11 or ER20 constant. Nut geometry, coating, bearing design, lubrication policy, thread condition, collet type and operation affect the specified value. Techniks warns that improvised extension bars can over-torque parts, crack collets or holders and produce inconsistent runout; it recommends controlled tightening with a torque wrench. Use the value and lubrication condition published for the exact assembly. More wrench force is not a remedy for poor grip.
Balance and maximum speed belong to the complete assembly
A holder may carry a balance grade or maximum RPM, but the usable limit is the lowest applicable limit across the spindle, holder, nut, collet, tool and any extension. Tool projection and assembled mass also matter. Never infer a safe speed from the ER series alone. Follow machine and tooling documentation, especially with small CNC spindles that can reach high rotational speed quickly.
Troubleshooting vibration and poor grip
| Symptom | Likely checks | Correct action | Do not do |
|---|---|---|---|
| Tool will not enter | Wrong range, burr, dirt, sealed or special collet | Remove, identify, measure and clean; select the correct collet | Hammer the tool or force the nut |
| Nut will not thread freely | Wrong nut/series, cross-threading, damaged or dirty thread | Stop and compare part numbers; inspect both threads | Use a wrench to start the thread |
| Visible runout | Chip on taper, damaged shank, excessive projection, worn collet, holder or spindle error | Clean, inspect and measure each link with a test bar | Keep tightening or strike the tool |
| Tool slips | Wrong range, insufficient approved engagement, contamination, incorrect torque or excessive cutting load | Stop; inspect the tool and assembly, then correct the setup and process | Add a cheater bar or reuse a scored shank |
| Collet stays in holder | Extraction groove not engaged, dirt, damage or galling | Follow the manufacturer’s removal procedure and inspect the nut ring | Pry against the precision taper |
| New vibration after a tool change | Incorrect seating, tool damage, collision risk, unbalanced assembly or changed stickout | Stop before cutting; reassemble and verify at the prescribed test condition | Raise speed to “smooth it out” |
A slip event is not finished when the tool is retightened. The shank, collet, nut, holder and workpiece may now be scored or dimensionally changed. Identify the cutting load that caused the event and verify the programmed speed, feed, depth, engagement and tool condition before restarting. If a collision occurred or is suspected, use the machine manufacturer’s inspection process.
Maintenance and safety checks
- Keep ER11 and ER20 parts in separate, labelled storage. Protect tapers, threads and extraction grooves from chips and impacts.
- Clean rather than abrade precision surfaces. Do not use sandpaper, a file or a powered wire brush on a holder taper or collet seating surface.
- Inspect slots under good light. A crack, distorted segment, deep corrosion or raised impact mark is grounds for removal from service.
- Follow the maker’s policy for thread and nut-face lubrication. A coated bearing nut may require a different condition from a conventional nut; uncontrolled lubricant changes the torque-to-clamping relationship.
- Track collets and nuts in demanding production. Repeated poor runout, slip marks or loss of grip can indicate wear even when the component looks acceptable.
- Never tighten an empty standard collet unless its manufacturer expressly allows it. Excessive collapse can permanently damage the segments.
- Confirm tool, collet, nut and holder speed limits before rotation. Use the lowest applicable limit and the machine’s required guarding.
- Secure the work, close the enclosure or guards, remove the wrench and verify toolpath clearance before starting the spindle.
- Stop immediately for unusual noise, vibration, heat, tool movement or witness marks. Isolate the machine before touching the assembly.
Frequently asked questions
Are ER11 and ER20 collets interchangeable?
No. ER11 and ER20 are different dimensional series. Each collet must be used with the matching holder taper and a compatible nut. Similar appearance or a shared shank diameter does not make their components interchangeable.
Can a 1/4-inch tool fit a 6 mm ER collet?
Not on the label alone: 1/4 inch is 6.35 mm. Do not force it into a 5–6 mm or exact straight-bore 6 mm collet. A conventional collet whose published interval explicitly includes 6.35 mm may be approved, but the safest choice is the exact marked inch collet or manufacturer-listed range for the holder.
How far should a tool shank go into an ER collet?
Use at least the engagement required by the tool and holder manufacturers, keep the whole grip on the clean cylindrical shank and avoid clamping flutes, radii or damage. Do not bottom the tool unless the holder instructions require or permit it, and use the shortest projection that safely clears the job.
Should the collet be installed into the nut before the nut is threaded?
Yes for a conventional ER assembly: engage the collet groove with the nut’s eccentric extraction ring and snap it into place before threading the nut onto the holder. This supports correct seating and extraction. Follow the product manual because specialty nuts and collets can differ.
Why does an ER collet show runout or vibration?
Common causes include contamination, a damaged shank or taper, the wrong collet range, incorrect nut assembly, excessive stickout, improper torque, wear, spindle or holder error, and an unsuitable measurement method. Stop, clean, inspect and measure the complete chain instead of adding torque.
Technical sources
- Haas Automation — ER collet assembly, series and selection guidance
- Haas Automation — DIN ISO 15488, product-family ranges and special collets
- SCHUNK — ER collet chucks and DIN ISO 15488-B
- SCHUNK — ER20 12–13 mm collet product data
- Techniks — controlled tightening, friction and ER runout
- Techniks — ER collet types, range and maintenance
The stated parameters are starting points. Test progressively on scrap and always respect manufacturer limits.